I love free stuff, and I think most people do, too. Last time I wrote a post about Ten Ways to Use QR Codes in Your Classroom to make teaching easier. Hopefully you've played around with the technology a bit now, and you're ready to try using it in your room. This post will help you do that, and it's super easy.
First, open the following website by clicking on the highlighted words in this sentence, or on the picture's caption.
Follow the numbered directions to create your QR code, starting with #1: Data Type. I chose to link to a website, but you can choose anything from the list. The following picture shows this highlighted in red.
Choose Your Data Type
Next, open a new tab on your computer and go to the site for which you want to create a QR code. For this example, I am going to create a link to Kiddle, which is Google's new image search engine for kids. Here's what the site looks like. (You can check it out by clicking on the caption, if you want.)
Next I'm going to highlight and copy the URL of the site, which is shown at the top of the next photo.
Copy the URL
Go back to the tab with QR Stuff open. Paste the URL you just copied into the box on step #2, like this.
Paste the URL Here
If you are using this site for business, you can sign up for tracking to find out how many people use the QR code. Click here if that's you. (Otherwise, don't worry about it.)
URL Shortener for Business Tracking
If you want your QR code to be in a color other than black, you can choose other colors on Step #3. If not, skip to the last step.
Want a Different Color QR Code?
Now your code is ready. Click the "Download QR Code" button for your free QR code.
Click "Download Now" to Get Your Free QR Code
It should appear almost instantly on your screen, like this:
You Free QR Code Will Appear on Your Screen
I suggest you rename the code, so that you can easily find it again later. Just double-click on the current name and type the name you want. I always leave the part that says, "qrcode" so I can search for them easily on my computer.
Press "Enter" to keep the new name.
Now that you have your free new QR code, how do you print it and use it? Simple.
First, open your favorite word processing or presentation software. I like PowerPoint for its ease of use. Add a text box and/or type your instructions. For this example, I'm just going to keep it simple.
Type Title and Directions into Your Document
Next, add the QR code. In PowerPoint I click on "Insert Picture" or "Insert Photo."
Click on "Insert Picture"
Then I click "Picture from File" in the drop-down menu.
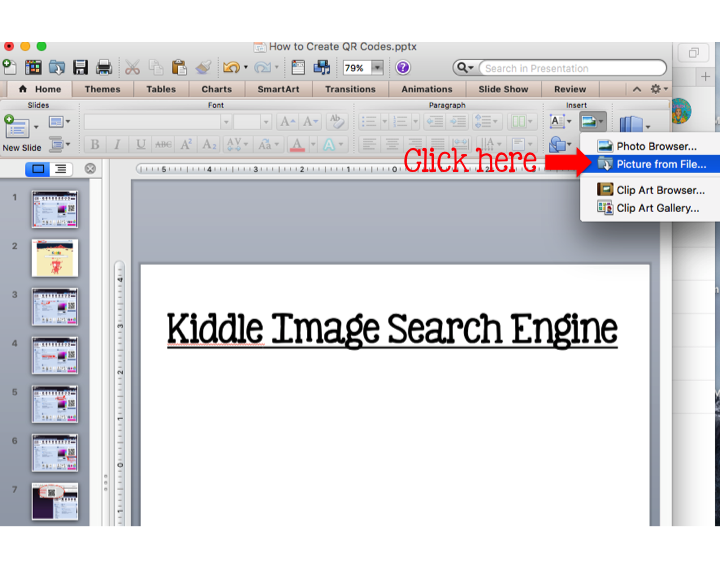
Click on "Picture from File"
I click on "Downloads." Then I find the file name I created and double-click on it to add it to my PowerPoint.
Follow These Steps to Add the QR Code to Your Document
If I want to change the size, I left-click on the QR code and then click on "Format" in the drop-down menu.
Lets-click to adjust the Size of the QR Code
In the new pop-up menu, click on "Size," and make sure that the aspect ratio is set to "Lock." Then use the arrow keys to adjust the QR code to the size you want. Then click "OK."
Follow the Steps to Adjust the Size
If your QR code is not centered, simply click and drag to the desired location.
Finally, save your document, print, and post in your room. It's ready for your students to use!
Print Your Finished Document!
I hope you have enjoyed reading about creating your own QR codes for free. If you do this for all the Internet sites you want your students to use, you will save yourself oodles of time in your classroom, plus you'll have far fewer interruptions during center time.
I would love to hear your experiences with QR codes, or any suggestions you might have for future posts. Please leave a comment below.
You've seen them: those weird-looking black and white computer-generated maze-looking thing-a-muh-bobs. You've heard other teachers extoll their virtues. Maybe you've even been asked at district trainings to use them in your classroom. However, it's one thing to hear about QR codes. It's quite another to use them and be comfortable with the experience. Once you understand them and use them, you'll wonder how you ever taught without them.
10 Ways to Use QR Codes in Your Classroom
In this post I'm going to talk about ten different ways you can use QR codes in your classroom to make your teaching life easier. Yep, that's right, easier! Bookmark this page to refer to as you begin the process. You'll be glad you did.
Okay, I get it. Starting anything new in the middle of the year is scary. You think you don't have the time, and what if it doesn't work? You're already tired and you just want a break. That's why the timing of this post is perfect. Spring Break is coming up for most teachers. State testing has already begun or is about to start. During your downtime, get some rest, and then start exploring something that will make your life easier in the long run. Trust me.
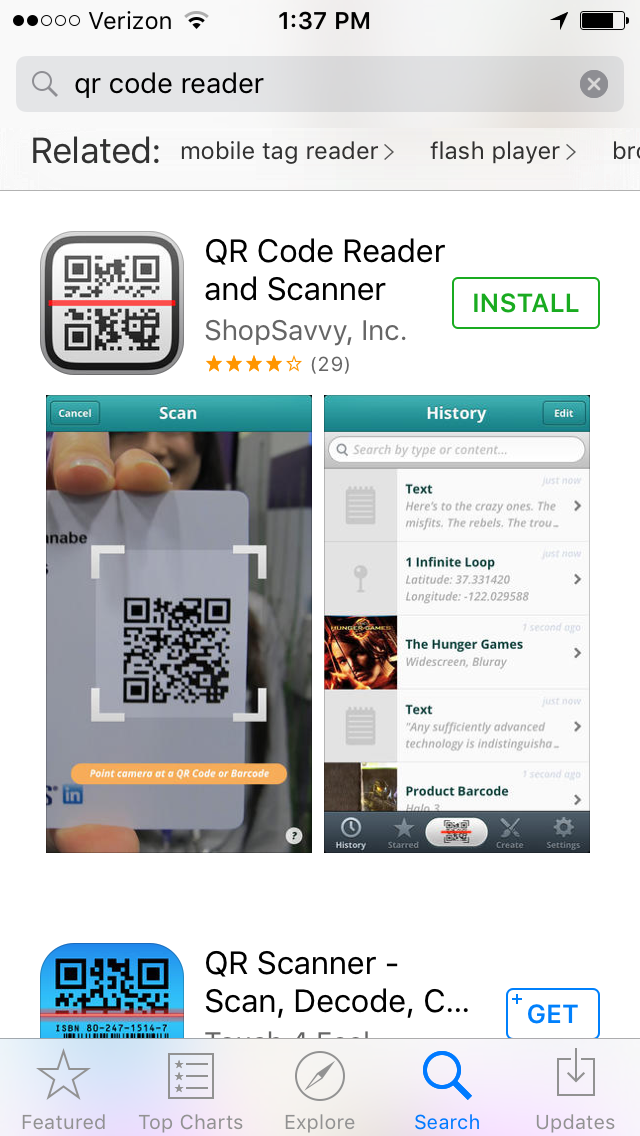
First, you will need to download a QR code reader from the app store. There are many free QR code readers out there. Here's a picture of the one I have on my phone.
QR Code Reader Available Free on the App Store
Once you have downloaded one of the free QR Code Reader Apps, play with it. Scan a few codes to become familiar with the process. You need to become comfortable with the technology before you will be willing to install it in your classroom, which is your home away from home. Here are a few of my own QR codes for you to scan with your new app, to show you how easy it is to use.
My Instagram Page
Simply open the QR code reader app on your phone. You will see something that looks like this:
Photo Taken from My Phone with QR Code Reader App Open
See those four white corners? Those are your guidelines. Now move your phone so those guidelines are around any of the the QR codes on this page. Here's a YouTube video I found which explains the process, too.
If the app is working properly, you will instantly be taken to the web page to which the code has been linked. Pretty cool, huh!
My Facebook Page
As cool as this is, how is it going to make your teaching life easier, you wonder? Here's how.
The first reason I decided to use QR codes in my classroom was to free up my time during guided reading groups. I wanted to use my classroom computers as a center, but I was ALWAYS interrupted by students who needed help getting to the appropriate web sites, whether it was for research, instructional videos, or math games. Even though I had the website addresses posted next to each station, my students mistyped the addresses. Every. Single. Time. It was so-o-o-o- frustrating!
Long Internet Addresses Can Be Difficult for Students to Type
The solution to this problem was to use QR codes! Instead of typing up and printing out the web sites for my students, I decided to print out the matching QR codes. Students simply opened the QR code reader apps, focused on the QR code, and were instantly transported to the appropriate website.
Kiddle: a New Visual Search Engine for Kids (from the creators of Google)
No more students interrupting me for help to get to the correct website, or worse, sitting and doing nothing because they couldn't do the work they were supposed to do!
No More Interruptions During Guided Reading Groups!
Another way to use QR codes is to have a "book" of QR codes next to suggested activities, so that your early finishers can choose their own extension activities from a list you provide. These codes could lead to reading activities, games, videos, Google Docs, you name it. If it is internet-accessible, you can use a QR code to link to it! Plus, you can change these "books" with new links as often as you need!
Students Working Independently on Computers
A third way to use QR codes can help you differentiate your instruction. Tape Qr codes to your whiteboard or place them in a center chart and have each group, or even each student, scan their own codes to lead to their own different assignments.
Use Qr Codes to Differentiate Instruction
These girls are using QR codes to learn how to use the other technology set up in their classroom.
Use QR Codes for Digital Instructions
Want students to interact with their classroom environment? Place QR codes on pictures or on posters around the room. Students scan the codes to watch a short video or hear narration related to the visual.
You can use QR codes in a listening center with a story to aid in comprehension of the text. Either link to the story being read on YouTube by someone else, or create your own audio file.
Use QR Codes to Link to Audio Files for Listening Centers
These students are recording their radio show project digitally. That way they can practice until they get it right, or edit it digitally. Once the project is completed to their satisfaction, they can link to it using a QR code.
Use a QR Code to Link to a Digital Project
Once recorded and linked, these projects can be viewed over and over again using the QR codes. Post the codes around your room at Open House and have parents use their phones to view them! This example is from a museum:
Parents Use QR Codes to Access Student Projects
Do you have a weekly or monthly newsletter for your classroom? Your principal will be really impressed if you attach QR codes with links to homework websites, like Khan Academy (Math) or Flocabulary (videos, songs, and activities across the curriculum).
Khan Academy Provides Free Math Homework Help
Flocabulary Has Free Songs and Activities to Enrich Your Curriculum
Do you keep a portfolio for your students to show growth throughout the year? Assign each student their own QR code to access their own online file, and have them share it with parents at home.
I saw a post a few days ago where a teacher shared that she uses QR codes to track homework. Every day that a student doesn't turn in their homework, they are required to scan the QR code, which takes them to a Google Doc. Once there, they click on the current day, creating a digital trail and proof that they know they did not turn in the work.
You'll notice the above picture has the QR code crossed out. That's just so that you don't accidentally go into her classroom data. :)
There is no end to using QR codes in your classroom. You can use them on worksheets. You can use them on business cards. Here's an example.
I Have QR Codes for Multiple Sites on My Business Cards
You can use them on your next resume to link to a virtual portfolio about you, your teaching methods, and your classroom. The possibilities are endless!
I hope you enjoyed reading this post. Make sure to follow my blog to see more posts like this. Join me next time to learn how to create QR codes to link to any internet site in an instant. It's easier than you think!
As an elementary school teacher, I found that new students
(and their parents!) were often nervous about their (or their child’s) new
teacher. I wanted to allay those fears as soon as possible, but how?
Class lists were a closely guarded secret until the Friday
before the start of a new school year. At 5:00 p.m., the office staff would
lock the doors, post the class lists, draw the shades, and escape out the back
door. Anyone remaining inside the office could hear the angry buzz as parents
realized that the ONE teacher (out of five or six at the grade level) whom they
had carefully vetted and chosen as their child’s teacher, was not the one to
whom their child had been assigned for the upcoming school year!
Class Lists Taped Inside the Windows at 5:00 Friday
The office phone began an incessant ringing, as a long
series of furious parents demanded immediate meetings with the principal, in
order to get their babies the “RIGHT” teacher. All the teachers knew from
experience that our principal would make NO class changes for at least two
weeks, in order to allow the dust to settle.
Parents Try to Move Their Children to the "RIGHT" teacher's Class
In the meantime, every teacher on campus knew that they
would have at least a handful (often more) of parents who DID NOT want their
children in that particular teacher’s classroom. Instead, they wanted their
child moved IMMEDIATELY to the class of the teacher they had chosen. What were
the teachers to do?
From experience, I knew I had to be proactive in order to
improve the situation before these children (and their parents) entered my
classroom on Monday! After much trial and error over the years, I came up with
several things I could do to improve the situation, allay parents’ fears, and
welcome my new students before the school year started.
First, I sent postcards to my new students. As soon as class
lists were released to teachers, I asked the school secretary to print out
labels with the names and addresses of all my new students. I affixed these to
welcome postcards, which I had already prepared with a message from me to each
student. All I had to do was to write each child’s name in the greeting of
their card, affix the address labels and stamps, and they would be ready to
mail.
On these postcards I invited students and parents to an
informal “Meet and Greet” with me, in my classroom, over the weekend, as I
prepared my classroom for the new school year.
I encouraged them to bring their school supplies, so they could drop
them off in the classroom and have them ready for the first day. (This also
allowed me to get a quick idea of which students could not afford supplies, so
that I could arrange for school supplies to waiting for them at their desks the
first day. J)
I set specific hours on Saturday afternoon and Sunday when I
would be available in my classroom, knowing that the school would be unlocked
at this time, and the gates would be open. Many other teachers would be in
their rooms, putting the final touches on their classroom environments and
getting ready for the new school year. I put the completed postcards cards in
the mail at the post office Friday morning, so that the cards would arrive to
my new students’ homes by Saturday afternoon.
It's important to put the cards in the mail in time to reach your students before the "Meet and Greet."
Many parents and students stopped by my classroom during
those hours. Many of the children held tightly to the postcard in their hands,
a shy smile on their faces. I made sure to stop whatever I was doing and greet
each child and their parents as they entered my room. I showed each child their
new desk, with their nameplate and books. I encouraged them to take a look
around, and ask any questions they might have.
Have student nameplates and books on their desks before the "Meet and Greet." Place a large Post-it note on the nameplate so that they can write any spelling changes they want for their nameplates. I gladly make these changes later, because I feel it is important to have preliminary nameplates ready for the "Meet and Greet." The few changes I have to make more than makes up for the positive feelings created in students when they see their names on their desks. The ones I have to change are even better, as the students come in the first day of school to the correct version of their names already on the desks. :)
My new students often head straight to some interesting
are of the classroom (such as the classroom library) and immediately begin to
explore. Then parents are free to meet with me, ask questions, and begin to
realize that I am an experienced teacher, and that I have the best interests of
their child in mind. More than one worried parent has shared with me that the postcards I sent
were the first piece of mail their child had ever received, and that they
really appreciated the personal touch.
Students Curl Up with a Classroom Library Book
You can find welcome postcards at most school supply stores.
I created my own, so that I only have to type the welcome message once. Then I handwrite
each student’s name in the greeting to personalize his or her card.